We hope you find these articles useful. To see more articles, sign up for our Membership Site.
 If you have ever experienced the joy of eating a salad made with your own home grown lettuce, tomatoes, cucumber and capsicum, you'd never buy these vegetables from the shops again! The difference in taste is such that you'll be rushing to the gardening centre to get more seeds so you can do it all again next year. But you don't have to…..
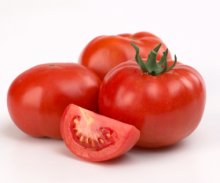
Tomato, lettuce, rocket, cucumber and capsicum are amongst the easiest vegetables to propagate from seed. By following these directions, you can save seeds from this year's crop ready to plant for next year. And if you didn't have a this year's crop, you can always save seed from a particularly tasty tomato, cucumber or capsicum that you bought at the shop.
To propagate tomatoes from seed, simply scoop out the seeds into a glass jar. Don't worry if a bit of pulp comes along with it. Screw on the lid and place on a sunny window sill for a few days until a fungus forms on top. This fungus will eat through the gelatinous coating on the seeds.
Once you can see the fungus working (around 3 days) transfer the contents of your jar to another glass jar and fill to about a third full with warm water. Anything that floats on top is waste – scoop this out. You should now have healthy tomato seeds on the bottom of your jar. Add some more water and swish around to help clean the seeds, then strain through a sieve to collect the seeds.
Place on some paper towel to dry out completely (say 2 or 3 days) and then store in an airtight container until you are ready to plant the seeds.
Lettuce is prone to bolt to seed during warmer months, so again is a simple vegetable to propagate. To propagate, simply let one or more of your lettuces flower. You'll know they are going to flower as the centre of the lettuce will become very long and the outer leaves will die off.
After flowering, you will notice small brown circular pods on the flower spike, about half the size of a pea. The seeds are inside these pods. Simply remove them, open and remove the small white slivers inside – these are your lettuce seeds.
As for all seeds, allow to dry completely on paper towel for a few days before storing in an airtight container.
Rocket is treated similarly to lettuce, only this time the seed pods are long and narrow – almost like a miniature dry crinkly bean! Let your rocket flower, then when the seed pods turn dry and brown simply pull them off and harvest your seed.
Propagating cucumber is similar to tomato, however with cucumber you want to start with plump large seeds, so let your cucumber stay on the vine longer than usual – let it start to go yellow and the foliage to die off.
Now scoop out the seeds into a glass jar and half fill with water. Place the jar in a cool dry place (out of direct sunlight) for a week. After a week scoop out anything still floating on top – all of your seeds will have sunk to the bottom. Don't worry if some don't sink – these seeds won't grow anyway. Now put some clean water into the jar and swish around to clean your seeds. Strain through a sieve and then place on paper towel to allow them to dry thoroughly.
As these are larger seeds, they may take a few weeks to dry out completely, so test before storing them to ensure they are dry by snapping one in half.
Capsicums are the easiest of all. When cutting your capsicum, simply scrape the seeds onto some paper towel, allow to dry for 24 hours and then store in an airtight container. No treatment required!
When planting your seeds the following spring, don't be disheartened if not every seed takes – not every seed in a store bought packet takes either. Just enjoy your free salad!
 There's nothing quite like growing your own produce, but if you've been successful you will eventually end up with too much. There are only so many friends willing to take your excess tomatoes. And at the end of the growing season, even though the plant is dying off, there are still plenty of green tomatoes left on the plants. What to do?
If your plants start to die off at the end of the growing season but you still have plenty of fruit left on them, simply pick them off.
You now have a choice: you can either use these to collect seed ready for next year's crop, or you can ripen them on a sunny window sill and use them up (more on that later).
I describe how to propagate tomatoes from seed in my article Propagating Summer Vegetables, but I'll repeat it here for the sake of completeness.
To propagate tomatoes from seed, simply scoop out the seeds into a glass jar. Don't worry if a bit of pulp comes along with it. Screw on the lid and place on a sunny window sill for a few days until a fungus forms on top. This fungus will eat through the gelatinous coating on the seeds.
Once you can see the fungus working (around 3 days) transfer the contents of your jar to another glass jar and fill to about a third full with warm water. Anything that floats on top is waste – scoop this out. You should now have healthy tomato seeds on the bottom of your jar. Add some more water and swish around to help clean the seeds, then strain through a sieve to collect the seeds.
Place on some paper towel to dry out completely (say 2 or 3 days) and then store in an airtight container until you are ready to plant the seeds.
OK, so you now have lots of ripe tomatoes. What to do with them?
You can make tomato relish, tomato chutney, de-seed them and squeeze for juice, but my absolute favourite thing to do is to make tomato sauce. Not ketchup type tomato sauce, but a beautiful tomato sauce you can use on pizzas (as a base), in pastas and lasagnes, in soups and moussakas. This sauce is so versatile, and can be successfully frozen in portions for several months.
Here's my own recipe:60g butter
2 tbsp olive oil
1 onion, finely chopped
2 tsps crushed garlic (or 3 garlic cloves, crushed)
1kg ripe tomatoes
1/3 cup finely grated parmesan cheese
Salt & pepper to taste
Melt butter and olive oil in a saucepan and add onion and garlic. Cook over a low heat until the onions are soft and golden.
Chop the tomatoes finely (you can use a food processor). Add to the pan and bring to the boil. Simmer, uncovered, for at least 30 minutes, stirring occasionally. For a really intense sauce, let the volume drop by 1/3rd.
Add the parmesan and stir to combine. If the colour is a little pale (depending what tomatoes you use) you can add a little tomato paste. Season with salt and pepper to taste.
Great with pasta and a little parmesan cheese, or use as a base for your pizza.
If you like a little more texture in your sauce, add chopped basil leaves, diced eggplant, de-seeded olives, sliced or chopped mushrooms and / or finely chopped capsicum after the onions are cooked. Make sure you cook these for a few more minutes to soften before adding the tomatoes.
Sauce will stay fresh in the fridge for up to a week, or can be split into portions and frozen for several months, although mine never lasts that long!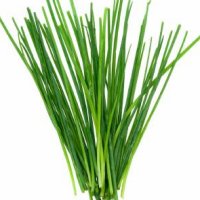 If you'd like to grow your own vegetables, but think you have a "brown thumb" – one that kills every plant rather than have them thrive, then why not try these easy veggies.
Too many first time gardeners set themselves up to fail by trying to grow vegetables that need a lot of looking after, and, quite frankly, can be very picky about weather and location and sunlight and so on. These five veggies are almost indestructible – chives, spring onions, English spinach, leeks and snake beans.
The first thing all of these five have in common is that you sow the seed where you want the plant to grow – none of this seed raising mix and transplanting business – that's when most seedlings die!
Just follow these simple instructions, and you'll soon have a green thumb (at least for these veggies).
Chives can be grown in a pot or in a garden bed. The soil doesn't have to be particularly great, just make sure it's neither sand nor clay. Normal potting mix will do the trick nicely if growing in a pot.
If growing from seed simply sprinkle the seed on the soil and water in well. Water regularly until seedlings emerge, then water as required. If you remember, give it a feed with soluble fertiliser once a month. If not – it will still grow. It will also multiply, so if it starts to get too big for the pot, simply lift it out, cut in half (or more if you really have a lot) and re-pot.
To harvest, simply snip off what you want with a pair of scissors.
Chives are great on boiled potatoes, in potato salad and other salads, and as a garnish on soups and stews.
Spring Onions are a little like chives on steroids. They grow similarly but are much more robust, larger, and are great cooked in soups and stews. Some people confuse shallots and spring onions – shallots have a clove (similar to onions) and spring onions are straight with no bulb at the bottom (similar to chives).
As for chives, simply sprinkle the seed onto the soil and then water in. Keep the water up until shoots appear then water as required.
These plants will benefit from feeding, but will grow just as happily without. They also self seed. The seed for spring onion forms at the top of a stalk and looks like a large pom pom. Allow this to flower and just let the seed drop onto the soil. If you are watering and feeding your plants, you'll have lots of new babies in a few weeks.
Harvest by snipping off what you require.
You can either grow this from seed, or look for a bunch in the supermarket which still has some roots attached. Cut off the edible portion and plant the base with roots attached.
If growing from seed, plant in a pot or garden bed. When planting, always plant the seed as deep as the seed is wide.
Water in well and keep the water up to it until seedlings emerge. Water during hot spells (you'll know when you need to water – the spinach wilts quite dramatically), and a regular feed with a soluble fertiliser like seaweed solution will do wonders for your spinach.
Harvest by taking the outer leaves first. Great in salads in summer, or cooked like regular spinach or Silverbeet in winter. Great for omelettes, quiches, stews, soufflés, and of course lasagne!
Another one you can grow from seed or by planting the base of a store bought leek which still has roots attached (although you will get much better results from seed).
Can be grown in a pot or garden bed. Plant out seeds and water in well. Keep up the water until seedlings emerge. If you fertiliser early you can get away with not doing this again, although growth will be faster the more you feed it.
To harvest simply uproot from the ground when ready (about 15" tall, although you can harvest them when they are smaller).
Leeks taste like fragrant onions – they have a very subtle flavour. They go well with pumpkin (pumpkin and leek lasagne is delicious) and can used is soups, stews and stir fries.
You may initially have trouble getting these seeds, but once you have planted them you'll never run out as you can harvest seeds from the plant.
Snake beans love hot weather, so they are really only a summer crop in most areas. They are a climber too, so you'll need some sort of trellis or lattice work for them to grow over.
Plant your seeds as deep as they are wide and water in well. Water regularly until you start to see growth, then no need to water until you can see the plant start to wilt.
Snake beans are prodigious producers, so it will be easy to let some pods stay on the vine to dry out for next years crop.
The earlier you harvest these the better – don't let them get too tough or they become inedible. These beans are great in stir fries and curries.
These five vegetables really are easy to grow, care for, harvest and propagate. So what are you waiting for – get out there and start growing – you can impress your friends with your own produce!
